For Foliage Follow-Up Sponsored by Pam Penick at Digging I'm featuring my favorite sweet potato vine (Ipomoea). On the 16th of each month garden bloggers join Pam at Digging to follow up Garden
Blogger's Bloom Day by illustrating the importance of foliage in our
gardens.
The Illusion Emerald Lace sweet potato vine is a bright addition to my container garden.
I like the bright chartreuse color and the unique open pattern of the leaves.
I had seen a similar leaf pattern with the darker leaves, but not in this color until I spotted one in the blue adobe courtyard at The Antique Rose Emporium as seen here last year.
Because of the deer problem in my yard, I do a lot of container gardening on the deck. This way I can enjoy annuals that are also deer favorites. I've mixed this Emerald Lace Potato Vine with 'Florida Sun' coleus, a bright polka dot plant (upper right), and pink firespike (middle).
Unlike most of my potato vine plants, 'Emerald Lace' did not make a tuber that I could winter over. I've also found it doesn't propagate from cutting as easily as other types and I purchased a new one this spring so it will brighten up my deck all summer.
Join Pam at Digging to to see more Foliage Follow-up posts.
Wednesday, May 16, 2012
Monday, May 14, 2012
GBBD May 2012: Mexican Hat Wildflowers
For Garden Blogger's Bloom Day (GBBD) May 2012 I'm featuring Mexican Hat (Ratibida columnifera) wildflowers. These common wildflowers here in south central Texas are currently blooming in my back yard. With their high rounded crowns, it's easy to see why they are commonly known as Mexican Hats. A striking color combination of gold and red.
The color pattern of the flowers on this plant are quite different from the others
Wildflowers are the best flowers for this sunny, rocky slope where little else will reliably grow.
For several years we've been collecting seeds from neglected and undeveloped commercial spots around the edges of our neighborhood and scattering them in the toughest part of the yard to create a wildflower meadow in this existing patch of buffalo grass.
That effort is beginning to pay off with blooms like these.
Join Carol of May Dreams Gardens and bloggers from around the world as we celebrate what's blooming in our gardens on the 15th of each month.
The color pattern of the flowers on this plant are quite different from the others
Wildflowers are the best flowers for this sunny, rocky slope where little else will reliably grow.
For several years we've been collecting seeds from neglected and undeveloped commercial spots around the edges of our neighborhood and scattering them in the toughest part of the yard to create a wildflower meadow in this existing patch of buffalo grass.
That effort is beginning to pay off with blooms like these.
Join Carol of May Dreams Gardens and bloggers from around the world as we celebrate what's blooming in our gardens on the 15th of each month.
Thursday, May 10, 2012
Monday, May 7, 2012
Plant ABCs - I is for Ilex Vomitoria
My series the ABCs of plants in my garden continues with the letter I. I is for Ilex Vomitoria or Yaupon Holly.
What a name! Vomitoria? Apparently early European settlers thought the native populations used the leaves as a tea to induce vomiting. That turned out to be a misunderstanding since the active ingredient in the leaves is caffeine. I found a few secondary references to the tea still being available in St. Augustine, Florida, but could not find the tea for sale.
While the yaupon holly is native to Texas, it is not native to San Antonio or the Texas Hill Country. It is one of the few varieties of holly that will reliably grow in our hot, dry environment here. There were other holly varieties planted years ago in the neighborhood, but many bit the dust in the recent drought. Those varieties also prefer acidic soil, so they do not do as well as yaupons in our limestone soil.
The dwarf yaupon (Ilex vomitoria 'nana') is in my yard as a hedge, and this row along the front was planted by the original owners' landscaper.
Yaupon holly is evergreen and very drought tolerant, we only watered this hedge a few times during the recent drought and never water the native ones. These have reached their mature size at around 3' high and we keep them naturally shaped by only trimming a few rangy branches now and then.
This one dwarf yaupon in the driveway island intrigues me since it was not part of the original landscaping and must have been planted by renters.
I kept it when we reworked this bed because it adds a green counterpoint to the mostly silvery plants here. Just for fun, I keep it trimmed in a softly rounded shape to fit better with the style of this section of the garden.
The yaupon holly is also available in a very attractive weeping form (Ilex vomitoria 'pendula') and I have just the place for two of those which I plan to add in the fall. The Ilex vomitoria has been a great plant for my garden.
What a name! Vomitoria? Apparently early European settlers thought the native populations used the leaves as a tea to induce vomiting. That turned out to be a misunderstanding since the active ingredient in the leaves is caffeine. I found a few secondary references to the tea still being available in St. Augustine, Florida, but could not find the tea for sale.
While the yaupon holly is native to Texas, it is not native to San Antonio or the Texas Hill Country. It is one of the few varieties of holly that will reliably grow in our hot, dry environment here. There were other holly varieties planted years ago in the neighborhood, but many bit the dust in the recent drought. Those varieties also prefer acidic soil, so they do not do as well as yaupons in our limestone soil.
The dwarf yaupon (Ilex vomitoria 'nana') is in my yard as a hedge, and this row along the front was planted by the original owners' landscaper.
Yaupon holly is evergreen and very drought tolerant, we only watered this hedge a few times during the recent drought and never water the native ones. These have reached their mature size at around 3' high and we keep them naturally shaped by only trimming a few rangy branches now and then.
This one dwarf yaupon in the driveway island intrigues me since it was not part of the original landscaping and must have been planted by renters.
I kept it when we reworked this bed because it adds a green counterpoint to the mostly silvery plants here. Just for fun, I keep it trimmed in a softly rounded shape to fit better with the style of this section of the garden.
The yaupon holly is also available in a very attractive weeping form (Ilex vomitoria 'pendula') and I have just the place for two of those which I plan to add in the fall. The Ilex vomitoria has been a great plant for my garden.
Friday, May 4, 2012
Propagating Barrel Cactus Pups
My post about Jean the cactus guy generated interest about propagating cacti, so this is the first in a series on how to start a cactus garden through propagation of cuttings from other cactus plants. The first in this series will document my process of propagating new barrel cactus from the one I purchased from him.
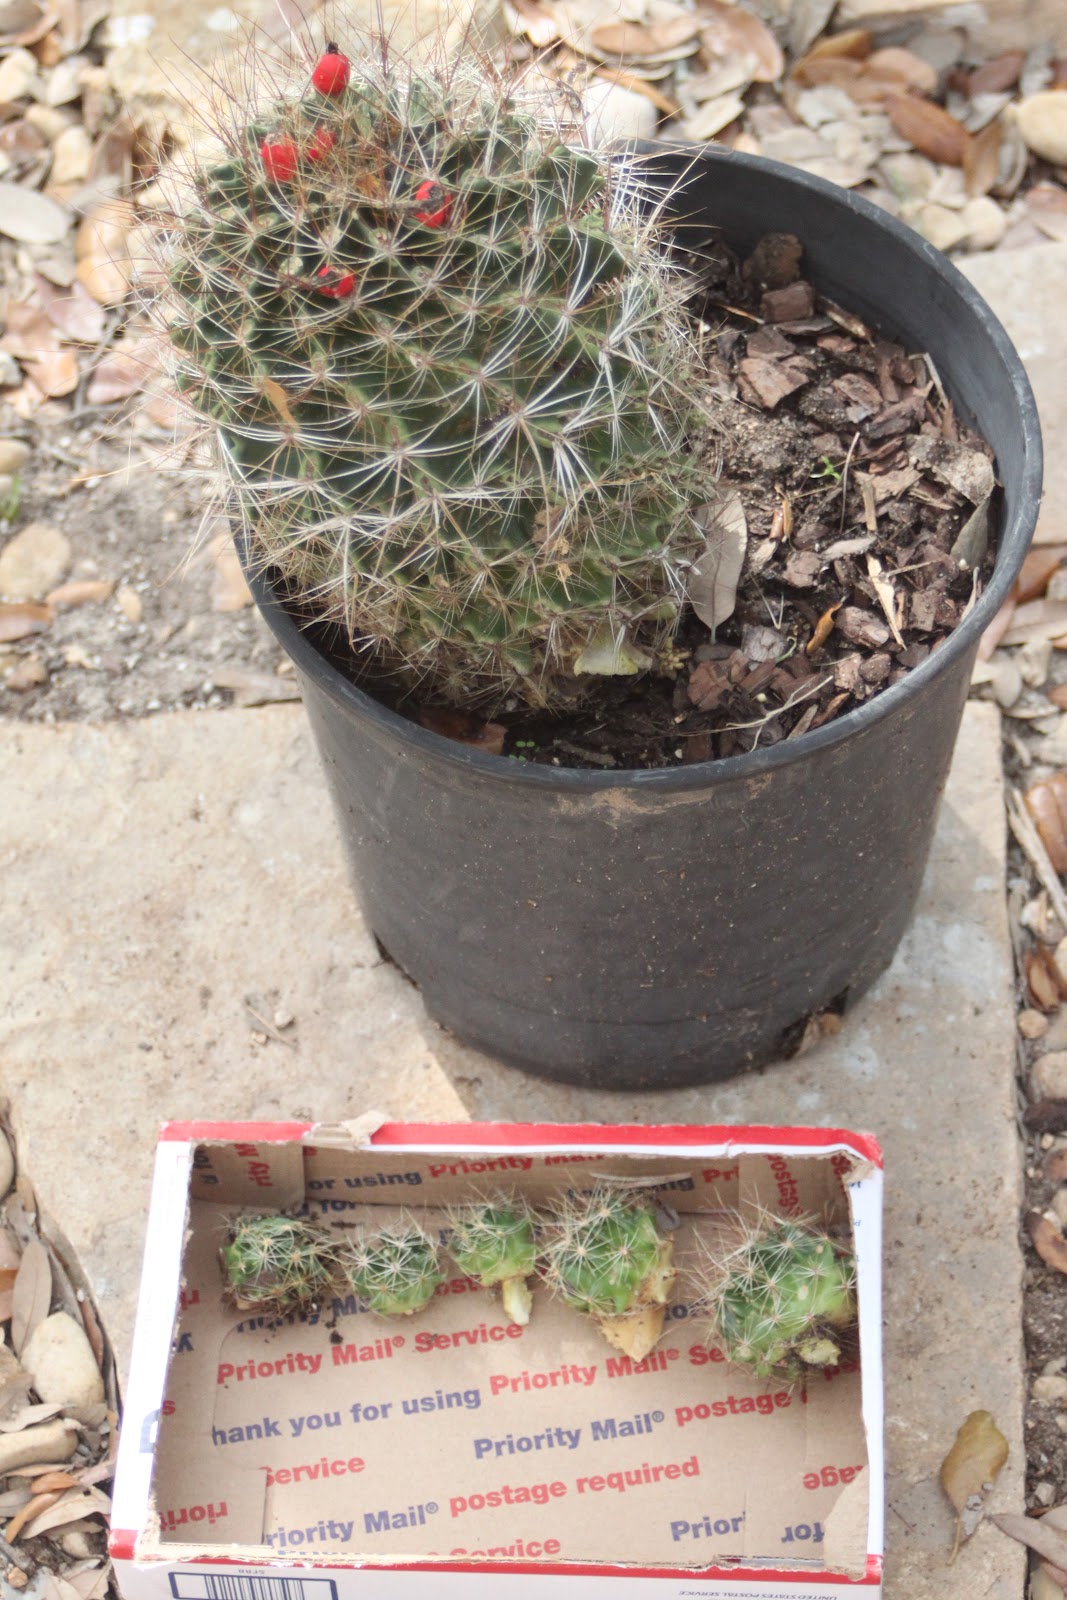
This barrel cactus arrived with five pups. The choices are to plant it as is, or to remove the pups and start them on their own. We decided to remove all five pups and start them as separate plants.
To state the obvious, cacti require special handling. Here's the array of tools set out, and although we didn't use all of them they were ready just in case. Old tongs and a variety of scrapers, chisels, knives and screwdrivers. Leather gloves are a must have. The tools should be clean.
There's one important tool missing from this lineup and that's an empty plastic pot to hold the mama plant while the pups are removed. It's important to find something you can grip and avoid the spines.
All ready to go and Mr. Rock-Oak-Deer starts with the old tongs and a scraper to remove the first one. One twist and a pull and it's separated so he discards the scraper and works with the tongs for the rest.
A slight twist with the tongs and they just pop right off. This action leaves small round scars on the larger plant.
Now he's working his way around the cactus.
Here are four of the pups ready to go on their own now, one more to go!
After the surgery we put the five pups in a box and stored them in the garage for about a week to callous over. If planted immediately the pups could rot, so they must heal first. We also stored the mama plant in a dry spot so its scars can heal. Do not water the plant or pups at this point to avoid any rot that might occur.
Fast forward one week later and the pups are ready to pot up. We are using a coarse sand over light potting mix for this phase. The key is to ensure fast drainage and only allow minimal contact with water to avoid rot at this stage.
Just use the tongs to place them in pre-watered damp sand. Don't water again for week or so, and then water once a week.
About five weeks later, here's what we have. Nice strong roots! The roots were even bigger than we expected. Note that this one was only pulled from its sand to show to you -- plant them with their sand. It will shift a bit, which is not a problem.
We planted them out in the new cactus patch along the dry creek. In their new home they are small and barely visible. We gave these plants plenty of room considering their size at maturity. We'd rather wait for cactus to grow into their space than move them later!
Next in this series I will show cactus pad propagation. I'll also continue to report on progress in the cactus garden.
This barrel cactus arrived with five pups. The choices are to plant it as is, or to remove the pups and start them on their own. We decided to remove all five pups and start them as separate plants.
To state the obvious, cacti require special handling. Here's the array of tools set out, and although we didn't use all of them they were ready just in case. Old tongs and a variety of scrapers, chisels, knives and screwdrivers. Leather gloves are a must have. The tools should be clean.
There's one important tool missing from this lineup and that's an empty plastic pot to hold the mama plant while the pups are removed. It's important to find something you can grip and avoid the spines.
All ready to go and Mr. Rock-Oak-Deer starts with the old tongs and a scraper to remove the first one. One twist and a pull and it's separated so he discards the scraper and works with the tongs for the rest.
A slight twist with the tongs and they just pop right off. This action leaves small round scars on the larger plant.
Now he's working his way around the cactus.
Here are four of the pups ready to go on their own now, one more to go!
After the surgery we put the five pups in a box and stored them in the garage for about a week to callous over. If planted immediately the pups could rot, so they must heal first. We also stored the mama plant in a dry spot so its scars can heal. Do not water the plant or pups at this point to avoid any rot that might occur.
Fast forward one week later and the pups are ready to pot up. We are using a coarse sand over light potting mix for this phase. The key is to ensure fast drainage and only allow minimal contact with water to avoid rot at this stage.
Just use the tongs to place them in pre-watered damp sand. Don't water again for week or so, and then water once a week.
About five weeks later, here's what we have. Nice strong roots! The roots were even bigger than we expected. Note that this one was only pulled from its sand to show to you -- plant them with their sand. It will shift a bit, which is not a problem.
We planted them out in the new cactus patch along the dry creek. In their new home they are small and barely visible. We gave these plants plenty of room considering their size at maturity. We'd rather wait for cactus to grow into their space than move them later!
Next in this series I will show cactus pad propagation. I'll also continue to report on progress in the cactus garden.
Thursday, May 3, 2012
Orange Frost Frenzy!
What plant are these folks converging on? What's so special it needed to be roped off? Are these people in danger?
Actually, it's the newly available 'Orange Frost' citrus tree. Certain to be a hit here in San Antonio because it is cold hardy, self pollinating, seedless, and bears sweet fruit. Other hardy citrus plants are too tangy or slightly bitter and often full of seeds, so this is a huge breakthrough. It's not scheduled to hit garden centers for two more years, but these were available this week only at the Texas State Master Gardener's plant sale associated with their annual conference held this year in San Antonio.
This is the Orange Frost tree I selected and it already has fruit set so we may get fruit this year.
See those cute little fruits!
I also picked up this Euphorbia 'Rudolph', a cold hardy variety with foliage that turns red in cool weather, and Euphorbia Breathless 'Blush' with a rosy tint to the foliage and flowers. These euphorbias have been available for a while, but I had not seen them locally.
This SmokeTree which has been on my list for a while
For those who have not seen one, here's a Smoke Tree in bloom on this website.
I also brought home dahlberg daisy for the cactus patch, a sun coleus for my container garden, and a copper plant. A good find was the John Fanick's Phlox in the center. A plant with a nice local connection, it was discovered growing here in San Antonio and named for a local nurseryman.
A fun item from the vendor's market were these Texas shaped native plant markers. Darla Horner Menking, a master gardener from Killeen, came up with this idea and had them manufactured. She's now making the rounds to sell at garden shows. At only a $1.25 each, I couldn't resist picking up a few for my favorite Texas native plants.
Darla doesn't have a website yet, but you can contact her at Suebizcreations@yahoo.com.
Plant sales are always fun for me and this was even more so since I was able to pick up a few plants from my list and also see some new varieties. I will report back on the Orange Frost fruit when they mature.
Actually, it's the newly available 'Orange Frost' citrus tree. Certain to be a hit here in San Antonio because it is cold hardy, self pollinating, seedless, and bears sweet fruit. Other hardy citrus plants are too tangy or slightly bitter and often full of seeds, so this is a huge breakthrough. It's not scheduled to hit garden centers for two more years, but these were available this week only at the Texas State Master Gardener's plant sale associated with their annual conference held this year in San Antonio.
This is the Orange Frost tree I selected and it already has fruit set so we may get fruit this year.
See those cute little fruits!
I also picked up this Euphorbia 'Rudolph', a cold hardy variety with foliage that turns red in cool weather, and Euphorbia Breathless 'Blush' with a rosy tint to the foliage and flowers. These euphorbias have been available for a while, but I had not seen them locally.
This SmokeTree which has been on my list for a while
For those who have not seen one, here's a Smoke Tree in bloom on this website.
I also brought home dahlberg daisy for the cactus patch, a sun coleus for my container garden, and a copper plant. A good find was the John Fanick's Phlox in the center. A plant with a nice local connection, it was discovered growing here in San Antonio and named for a local nurseryman.
Darla doesn't have a website yet, but you can contact her at Suebizcreations@yahoo.com.
Plant sales are always fun for me and this was even more so since I was able to pick up a few plants from my list and also see some new varieties. I will report back on the Orange Frost fruit when they mature.
Wednesday, May 2, 2012
Subscribe to:
Posts (Atom)

.jpg)