.jpg)
The "new" steel fence was purchased off Craigslist in excellent condition because the family installed a pool and needed a privacy fence. We have found so many good deals on Craigslist.
This was the last piece of old fence and it had definitely seen better days.

There was a notch in the old gate for this tree limb which is headed for daylight around the corner of the house. It is not deformed or falling down, that's just what live oaks do, growing horizontally as needed.
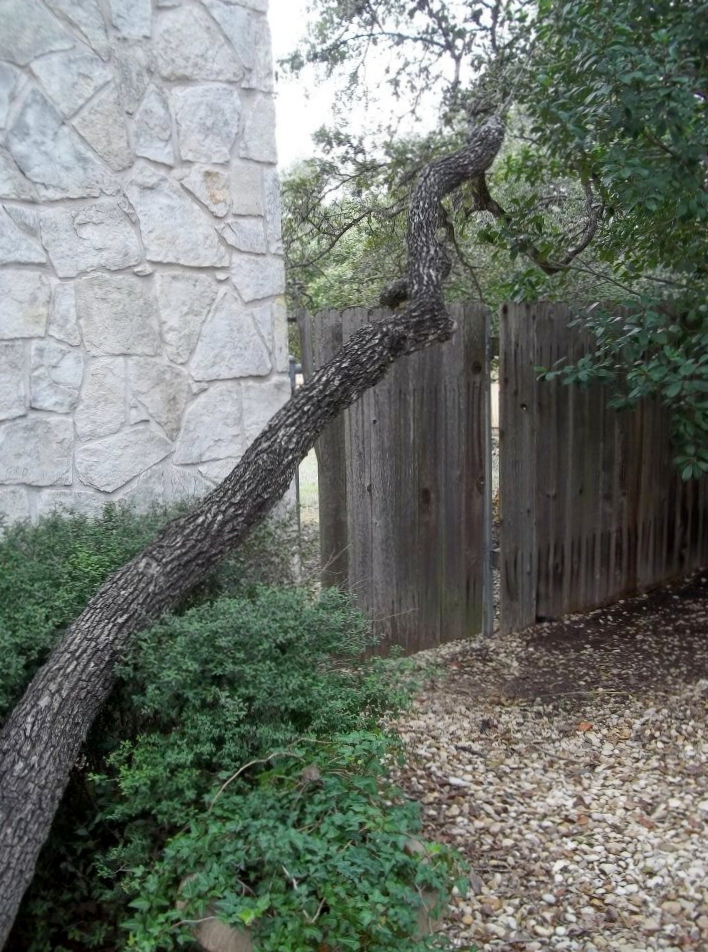
Hello big limb. We are still debating about cutting the limb off since it is in the way when you go through the gate. Trees are so special here, especially these sculptural live oaks so it takes a lot to cut a limb like this. The wood gate was so heavy it dragged the ground.

This is so much better. The gate is easy to open and the limb is propped up with a stick for now. We'll see how long this lasts. We'd like to save the branch because it adds character. It's not fun to hit your head on it though, as DH will attest.

Installing the posts requires concrete. Mr. R recommends putting a small amount of water in the wheelbarrow first prior to adding the dry concrete mix to make it easier to get the water incorporated. Mix to a consistency that can be shoveled into the holes, so not too runny.
.jpg)
We set the two end posts first using concrete chunks from the old fence to hold them in place and fill the holes. Use a level to make sure the post is straight and brace it to stay in place. After setting the first two posts we waited a few days to make sure they were solidly set before proceeding.

This type of fence is easy to install and the 8' panels and 3' gate fit right into the existing holes. No small consideration because digging in our rocky soil is not easy. It's easier to put the fence posts with panels attached in place in their empty holes to ensure a proper fit. The panels have a certain amount of adjustment built in, but only before the concrete dries. Here they are held in place with rocks and old concrete chunks after leveling prior to filling the holes with concrete.

We made further adjustments while the concrete was still wet.
.jpg)
The concrete doesn't have to be pretty as it will be covered with dirt. The fence panels hook on to brackets with bolts. The height can be adjusted along the length of the post and the bolt holes allow for a small adjustment in length making the process easy.
.jpg)
We set the fence panels high to allow the planting bed to run right under it. They are easily adjusted for height if we choose to make changes. I like the view through to the front so much better and I can plant under the Red-tip Photinia now that light can get through in what was a very dark area before.

We had installed this same fencing between the garage and the house last year. Now the two sides of the yard match.
On to the rest of our list, racing the calendar to get big projects completed before it gets too hot. Next up is extending the perennial border around the buffalo grass lawn.
.jpg)
That includes a truckload of dirt for the new beds. Yippee.
Looks great.
ReplyDeleteI like this kind of fence. Keeps the deer out, but doesn't block the view.
You're getting a lot done there.
Good (hard) job.
The deer go right over the same fence by the garage, we're hoping the Red tips will help though.
DeleteI hope you didn't have to uninstall! That must have been a much bigger job. A wonderful improvement and a very satisfying project. I really don't like the majority of wood fences that are installed. They make such a miss-mash of the neighborhood. Having said that we once installed a wooden fence when we lived in St Louis but I like to think it was tasteful. You can't take the English out of me when it coming to enclosing my gardens.
ReplyDeleteThe neighbor had some guys working on his fence and DH offered them our old fence. He undid the bolts and they carried the still reusable panels away. Recycling the San Antonio way. We still had to get the posts out and that took some doing. I'm never sure just how much readers want to see of our DIY adventures.
DeleteThis looks so great....now I know what to do with the security grates we never installed over the windows of our house in town.
ReplyDeleteThey would make good fences or gates to a garden. I'm looking for a gate for the deer-proof garden now.
DeleteI love wrought iron fences, but I do live in London and here they are everywhere of course, just not in my garden...That's a lovely project you have done and makes for a great backdrop for plants all year round.
ReplyDeleteYour old oak certainly have loads of character!
The fences are fascinating there, so many different designs. We are so excited about getting this area planted.
DeleteThe new fence looks fantastic! Good job. I love the twisty oak limb, but if you decide to shorten the branch it will grow back fairly quickly and you can direct the growth upwards. Next time you come over I'll show you how much length the horizonal oak branches next door gained after the limbs overhanging the driveway were shortened. I was amazed at how fast they grew.
ReplyDeleteRagna
Thanks R. I'll take a look at that soon. This one is tough to figure out where to cut.
DeleteOh, it looks great! I love that you can see through it, instead of it blocking your view. I am going to have to check out Craigslist! The oak tree looks like it's trying to escape by going out the gate! :)
ReplyDeleteCraigslist is a great resource for just about everything house and garden related.
DeleteEscape to the light.
Oak trees are so interesting, and I agonize over each limb I cut, even though we have lots of them. My husband might think I am a little silly . . .
ReplyDeleteIt's a tough one, the only limb on the tree and it branches in an odd place.
Delete